Tutorial
|
INTRODUCTION: A trainer is a program written to intercept and alter the memory addresses of games that are running in the background. Usually trainers contain such features as GOD MODE, UNLIMITED LIVES and others that sometimes aren't pre-programmed into the game by its designers. Some people believe that creating a trainer
is extremely difficult and requires all kinds
of programming knowledge and skills. Not true.
Some very friendly tools have been created to
allow anyone to make their very own trainers for
their favorite games. In these tutorials, we'll
teach you the basics of how to get started and
give you step by step instructions on creating
trainers that you can follow along with on your
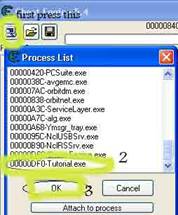
own. A Visual Tutorial of Making a Trainer for Those Who Are Interested in Trainer Making and Those Who Are Beginners or Semi-pro in It Table of Contents: - Introduction Introduction: So guys I decided to write this tutorial for those who like to make trainers, themselves and I should note that what you're going to learn here is a sample of hard workings that the pro-trainer makers are doing everyday for every game in CHU. Fist I decided to bring a game and tell you what you should do for making a trainer for that specific game; but my idea has changed and I think it's better for all the beginners to pass all 9 steps in the tutorial that is came with cheatengine while you install that. Then I bring a game and show the method for using the steps in a game, specially a game that has dynamic addresses which you'll be familiar with them later. The programs that are used here are: Step 1: Choosing a process First you should open cheatengine and then the tutorial.exe, after that you should choose this tutorial program in cheatengine; for doing this go to up left corner of the CE and press the computer symbol; another screen will show up, here you can make a process, choose a process, attach to a process and …, but in this case you should you should find the Tutorial.exe then select it and press the OK button; now if you check the upper side of CE main page you'll see that the name of the process is showed. Ok guys now go to tutorial program and click the "next" button. So you will reach to Step 2.
Step 2: Exact Value Scanning 090453 The goal of this step is to change the value that is shown in tutorial program to 1000, so that the "next" button became clickable and you could go to the next step. First you should find the address of the value and change it; for doing so go to CE main page and choose the scan type "exact value" if it's something else and the choose "4 bytes" for value type and specify the current value that must be 100 if you didn't hit the button yet.
After defining all of these options press the "first Scan" button. Some addresses with that specific value will be revealed in left side of CE main page.
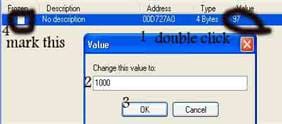
The value will change, now go to CE main page. In my case it changed to 97 so I must put this value in value box and click the "Next Scan" button. Probably one address will remain in the left side. Double click it and it will go to the lower part of the CE.
There you can change the value. For doing that double click the value, (or select it and press enter), and change the value to 1000.
So the "next" button will be clickable on tutorial program; click it and welcome to step 3. Step 3: Unknown initial value The goal of this step is to fine the health bar value and change it to 5000. Sometimes the value that you're looking for is not clear, for example when you want to find the health bar address or anything that its value is not known. In this step there is a bar at the bottom of tutorial program that will decrease every time you click the "Hit me" button. So you don't know the exact value for looking for. In these situations go to CE press the New Scan button and choose the Scan Type as "Unknown initial value", then press First Scan button.
The addresses would be too many so go to tutorial program and lose some health by clicking "Hit me" button.
Now go to CE and choose the Scan Type as "Decreased value" and then press Next Scan.
If still there is more than one address again go lose some health and scan again until you get one address. Like the previous step bring it down and change its value to 5000. Step 4: Floating points (PW=890124) The goal of this step is to find the address of ammo and health in tutorial program and change it to 5000, while these addresses are not like the previous ones. Health is stored as a float and ammo is stored as a double.
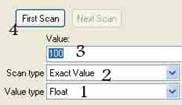
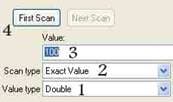
These kinds of addresses are to make it hard for memory scanners to find an address very easily, and often they are not an integral number and may be ordinal numbers which have some digits after the number. So find the addresses by using one of previous steps; exact value may work here but it's better to use other ways such as step 3 method. Keep in your mind that for finding the health address you should change the Scan Type to Float and for Ammo change it to Double.
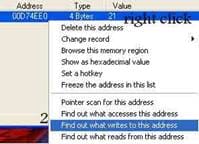
If you had done everything right so the "Next" button will be appeared. Welcome to step 5. Step 5: Code finder (PW=888899) The goal of this step is to find the address of the value in tutorial program and freeze it. You should know that in most of the games the address you are looking for is changed each time you open a game, even the addresses may change during the game. So you can use this function, code finder for solving this problem. The address of the value under the tutorial program is changed every time you reopen the program. So if you find its address and then close the program, when you have opened it again, your address will not work anymore. Here you will learn what to do for these cases. First find the address of the value with one of the ways you have learnt before, and then bring it down. After that right click on the address you have found and choose and choose "What writes to this address".
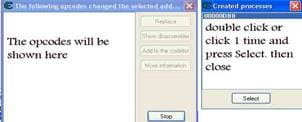
A confirmation question will come and want to attach the CE debugger to this program, so click the Yes button. As a result two other windows will be opened. In the window that its name is "created processes" you can choose the program that is still running, click on the code and press select or simply double click on it and close it because you don't need it anymore. In the other window the changes of the address that you found earlier is recorded as its name says "the following opcodes changed the selected address".
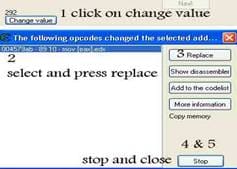
Now go to tutorial program and press the "change value" button. You can see that an opcode will be appeared in the debug window. Click on it and press the "replace" button at the right side of the program and then press the "Stop" button at the lowest part, cause you don't need to debug anymore.
Ok, now you may ask what that special button does. It simply brings the opcode to codelist in "advanced options" and then enable it. So what is its benefit? That obvious you don't need to search for the address every time you open the program you can just go to "advanced options" and right click on the opcode you had found before and choose "Replace with code that does nothing" to make it enable.
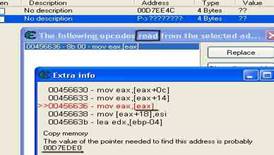
Ok when you did all that go to tutorial program and click the "change value" button and later if you want to disable it right click on it and press "Restore with original code", as you can see the next button will be clickable. Go to step 6. Step 6: pointers (PW=098712) The goal of this step is to find the address for the value in tutorial program and changing it to 5000 and the freezing that. In last step you have found the way finding the location of an address that change every time you reopen the program and freeze it. So you don't know how to change its value you can just freeze it by its current value. Here you'll understand how to change the value for them. Ok find the address for the value and bring it down. Right click on it and press "What writes to this address". Go to tutorial program and change the value but not the pointer. Come back to CE you will see the opcode, double click on it or press "more information" button. Another window will be appeared which its name is "Extra info". Here you can see five opcodes. One of them is red you should make a note of the things that are between " [ " and " ] ", you will need it later. Under these opcodes there this sentence: "The value of the pointer needed to find this address is probably, for example, 00D7A1A4". So write this code down, too.
Now go to CE and tick the square beside the value box cause you need to do a hexadecimal scan for the value you had found in "Extra info" window; it is the value that is at the end of the above mentioned sentence. So do a scan for it. You will find one address with this value.
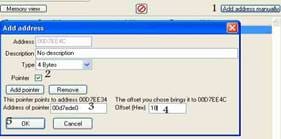
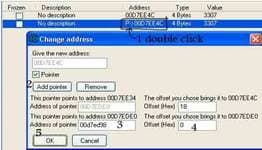
So keep it there. Now press the "Add address manually" button. In the new window which its name is "Add address", first tick the square to enable the pointer. In the "Address of the pointer" box, write the address you found from hexadecimal scan. And in "offset" box write the value you had found in "Extra info" window; I mean the value that was between "[" and " ]". If it was, for instance, [eax] it means the offset is "0", if it was, for example, [eax+a1] so your offset is "a1".
For more complicated offsets check the information in tutorial program which will not use here. After completing these boxes press ok. Now another address will be appeared with this form: "P->xxxxxxxx". Double click on it and change the value to 5000 and freeze it.
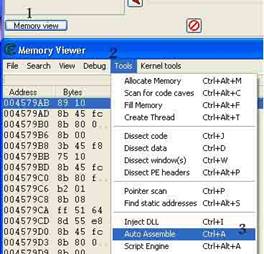
Go to tutorial program and press the "Change pointer" button. If you have done anything properly the "Next" button will be clickable. Press it, now you are in step 7. Step 7: Code Injection: (PW=013370) The goal of this step is to increase the value with 2 any time you clicked on "Hit me" button. Normally it will decrease when you press that button. So here is what you should do. First find the address of the value and choose what writes to this address, press "hit me". An opcode will be appeared, double click on it and take a note of the address from the opcode that is red. If the opcode was "00456C13 - dec [ebx+0000030C]" then the only thing you need is just to keep the "00456c13" in your mind. Now you should open the auto assemble window. For doing that you should go to CE main page and then click on "memory view" button. In the new window go to "tools" -> "Auto assemble" or simply in CE main page press "Ctrl+Alt+A".
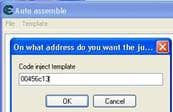
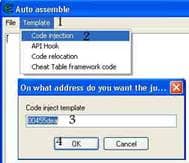
In the new window go to "Template" -> "Code injection".
In the new box write the address you have found with opcode and press ok.
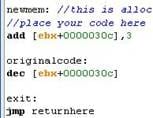
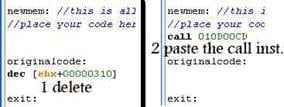
The auto assemble window will change and some information will be appeared in it. In this basic assembly you need to change two parts: 1- under the newmem option and after the blue sentence you should write your new opcode that will change the value to 2 more instead of losing one. 2- originalcode- you can delete the opcode under this option because its function is to lose the value for 1 every time you press "hit me" so if you don't delete this you should change your opcode to increase 3 values every time you press "hit me" so that the tutorial program work. For making these changes you can use a simple instruction like "add [ebx+30c],2" and if you don't delete the opcode under the originalcode you should write this in newmem: "add [ebx+30c],3" so it increases 3 value and the originalcode decreases 1 and as a result 2 value will be added.
Then go to tutorial program and press "hit me", if you do the entire instruction properly the next button will be clickable and you can go to next step. But wait you may need this code later and may not like to scan any time you reopen the program. So in auto assemble window click on "Template -> Cheat table framework code" and then go to "File -> assign to current cheat table".
So the new address will be added to cheat table. To edit this address you should right click on it and click on "Change script". There are some other ways to change these opcodes like using some different commands such as "sub" or "mov" that you will learn with practice. Now go to step 7. Step 7: Multilevel pointers: (PW=525927) The goal of this step is to change the value in the tutorial program to 5000 and freeze it and then change its pointer. In this step you should find the pointer, like as you did in step 6, but the problem here is that the first pointer that you will find is not the base pointer so you should find the pointer to that pointer. Usually the base pointer is in green color, so if the pointer that you have found is not in green find the pointer to that pointer again. Note: you may confront with some problems such as getting a wrong opcode if you don't do the instruction exactly. Start this: find the address, ask what writes to that address, and change the value in tutorial program. Double click on opcode and make a note of the things that are necessary.
Do a hexadecimal scan for the pointer to that address (note: if the result of the scan was in green color it's a static address but here it won't be like that until four scan).
Add an address manually in CE main page. Write the pointer and its offset.
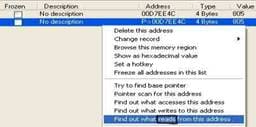
Now ask WHAT READS FROM THIS ADDRESS for the pointer that you has just made.
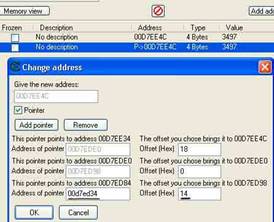
Now go down the main page and double click on the address which is like this "P->xxxxxxxx" and in pointer window click on the "Add pointer" button, so write the new address and its offset in new boxes.
Again find what reads from that pointer and get the opcode.
Add it to the last pointer.
Again find what reads from that pointer and get the opcode.
Scan for the next pointer. Note: if it was in green color, so there's no pointer to that and you don't need to find what reads from this pointer again.
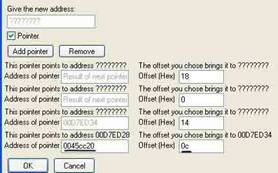
Add new pointer to the last one.
Keep in mind that you should use "What writes to this address" just for the first opcode but for the other 4 opcodes just use "What reads from this address". After finding four pointers you will get the pointer that is static, so it's the last one add that to the last pointer and change the value to 5000, after that freeze the pointer.
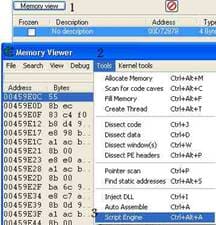
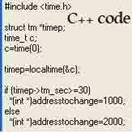
Now go to the Tutorial program and click on "change pointer" button. If the entire process was right the next value will be clickable. Welcome to step 8. Step 8: Injection++: (PW=31337157) The goal of this step is to edit the opcode that decreases health with a piece of code that sets the health to 1000 if the current second is equal to or bigger than 30, and 2000 if it's smaller than 30. As you may understand from the name of this step, I mean "++", you should use C++ coding to pass this step. But if you don't know how to do that use the sample code from here: #include <time.h> Now I show you how to do that. First find the address then From CE main page go to Memory view and press "Ctrl+Alt+A" or go to "Tools->Script engine".
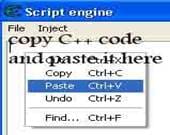
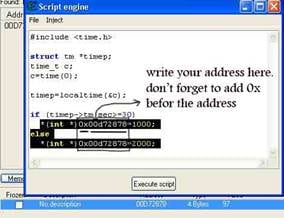
Here you should insert the above C++ code.
After inserting the code, go to "Inject->Inject into current process".
An instruction like "call 012300CD" will be appeared. Make a note of that.
Now go and find out what writes to that address. Change the value. Double click on the opcode and make a note of the address which is in red color.
Now you should do a code injection like you had done in step 7, so go to CE main page and press "Ctrl+Alt+A" then go to "Template->Code injection" and write the address which was in red color in the box, then press "Ok".
Under the "newmem" write the "call" instruction you have got, for me it was "call 012300CD". After that, delete the opcode which is under the "originalcode".
At last press "Execute". Now go to tutorial program and change the value. If you had done rightly the value should be changed to 1000 or 2000 and the "Next" button will become available. Congratulation, you did it.
Real Game Hacking I should mention that the most applicable way in trainer making is code injection by Auto assembling. So I brought here a sample for you to become more familiar with this method. I have used this game: LUXOR-Amun Rising. The first thing that helps you is window mode for games. So if it's possible to play the game in window mode do it, because for some people with regard to their hardware system, it is problematic to use Alt-Tab method. If the game has not the window mode and you are not interested to use Alt-Tab go and search for programs that do this for you.
About this game: as an example, for getting +1 life you should get +30 coins. So I want to change the value of 1 coin to 30 coins, so that if you get 1 coin you will get 1 life.
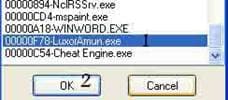
Instruction: open the game and then open the CE. Choose this game's process name in CE.
Scan for coins. You have no coins?! So scan for 0. Go to game get coins and come back to CE scan for the number of coins or scan for increased value. Do it until you get the address. Ask what writes to this address. Get one coin in game to get the opcode.
Double click on the opcode and make a note of the address that is in red color.
Go to CE main page and press Alt+Ctrl+A to access to auto assemble window. Make a code injection to the address you have got. You will get a code like this picture,
Then go to "template->cheat table framework code" and after that go to "file->assign to current cheat table".
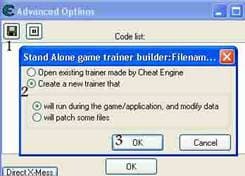
Make the Trainer Kit by Cheatengine Now you may want to create a trainer using the addresses you got and also using the codes that you have made. To do that go to CE main page and then press "advanced options". In the new window, click on Disk icon and in the next window press "Ok".
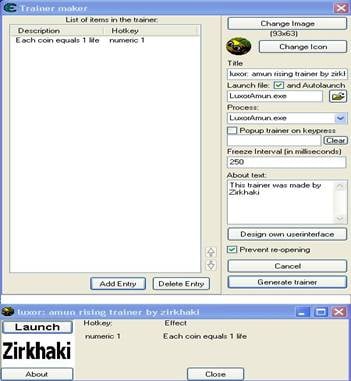
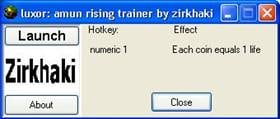
So, two windows will appear. You can input your data in the left window and see the result in the right one.
By clicking on "change image" you can choose an image for your trainer; your picture should be in "bmp" format.
To change your trainer icon click on "change icon" and choose the game's icon by clicking on its "exe" file. Write a title for your trainer. For the next box write the game's "exe" name; if you don't know that, click on the load folder that is in the left side of the box and find the "exe" file of the game.
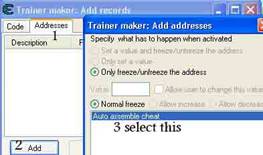
After all of these click on "Add entry". A new window will be appeared which has two tags, code and addresses; in the "code" tag you can choose the opcodes, if you had one. And in the "addresses" tag you can choose the static addresses, pointers and scripts which you had made. In this case we had made one script about the coins, so click on "Add".
After that, you should complete the two boxes which are for "Effect and Hotkey". In "Effect" box write the effect of the code that you added. In "hotkey" box press the desired hotkey you want. Then press "Ok" and you will come back to the former window. Change the trainer window size by changing the size of right window. At last press the "Generate trainer". Choose the destination folder and a name for your trainer in the new window. PRESS SAVE. Congratulation, you made your trainer.
Contact: [email protected]
|

